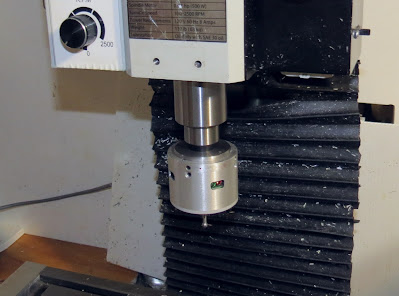
I'm putting the finishing touches on a 3-pin style probe for my little CNC mill and figured I'd share what worked. The 3-pin switch is amazingly sensitive - closer than I can measure in my shop. I've already used it on one project so far, and after years of manual edge finding and fighting with flipped parts, it's pretty awesome. This page does a much better job than I can do to explain how it works: https://www.silvercnc.com/touch-probe/ A bunch of folks have made these, and you can even buy a pretty decent looking version on Aliexpress for under $70US. (V5 Touch Probe)
The goal was to keep it as short as possible in the vertical axis and to be able to use it on both CNC and manual machines. In order to use it on the manual mill, I needed some visual feedback (also helpful on the CNC), so I added red and green LEDs to indicate the state of the switch.
Mechanical:
The switch mechanism consists 3 radially spaced horizontal pins resting on 6 steel balls. The balls are soldered to a copper circuit board that's been machined to isolate the balls in pairs. A stylus on the bottom of the mandrel is used for probing and when it touches a surface in any plane, one of the pins will lift off the ball, breaking a circuit. This creates a very sensitive electrical switch.
Centering and calibration are managed by a steel hub with a press-fit 1/4" shank to mount in the machine spindle, a V-groove, and a top lip. That inserts into an outer aluminum ring with set screws that engage the V-groove and lock it in place. There is about .030" clearance on the ring/hub interface to allow for centering.
3 long bolts run from the bottom acetal plate into the top aluminum ring, capturing an outer aluminum housing.
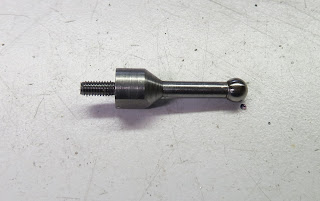
The stylus is a turned steel part with a 3/16" ball bearing soldered to the bottom end with 3mm threads on the top to attach to the mandrel.
Since none of my machines are particularly accurate, the probe is calibrated for the CNC mill, which is where I'll use it most. In order to maintain rotational orientation, it's mounted in an R8 tool holder that always goes back in the spindle in the same orientation. That way, I can calibrate it to about +-.001" on the CNC mill. I care a lot less about accuracy on the CNC router, so any runout will be close enough. On the manual mill, I can rotate the probe to take multiple readings and get an average. (there's about .002" difference in runout between the two milling machines - I suspect it's mostly in the old worn-out manual mill.)
Electrical:
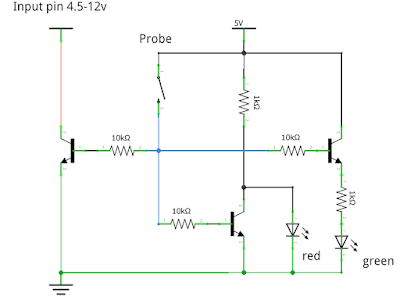
The electronics consist of an inverting circuit that lights the red LED when the switch is open and green when closed. A transistor acts as a switch for the probe circuit, driven by the 3-pin switch.
My two CNC controllers use different voltage for the probe signals. The router uses a Gekko G540 which outputs 12V at about 7ma. The mill uses an old Probotix breakout that outputs about 4.3V at 2.5ma. I was a little worried about getting them both to work on the same wiring, but they seem happy. On both machines, I pulled 5V power from the internal power supply so there's a single connector. I used DB9 connectors on the controller box with just 3 pins active.
The connector on the probe itself uses mini-USB with Vin, ground and Data+. (But, it's NOT USB protocol, just the wiring.)
For use on the manual mill, a 5V wall wart with a 10K resistor on the probe circuit (without it, the transistor gets hot, smells bad then stops working...), and just use the lights to tell when the switch is triggered.
Mach3 code - (be sure to test and use at your own risk)
Here's the code I use for probing the ID of a circle:
If GetOemLed (825) <> 0 Then 'Check to see if the probe is already grounded or faulty
Code "(Probe plate is grounded, check connection and try again)"
Else
FeedCurrent = GetOemDRO(818) 'Get the current settings
XCurrent = GetDro(0)
YCurrent = GetDro(1)
Code "G4 P1" 'Pause 1 second to give time to position probe plate
Code "F4" 'slow feed rate to 4 ipm 100mm
Rem Probe Left
XNew = Xcurrent - 3 'probe 3 inches to left 75mm
Code "G31 X" &XNew
While IsMoving() 'wait for the move to finish
Wend
XPos1 = GetVar(2000) 'get the probe touch location
Code "G0 X" &XCurrent 'rapid move back to start point
Rem Probe Right
XNew = XCurrent + 3 'probe 3 inches to right 75mm
Code "G31 X" &XNew
While IsMoving()
Wend
XPos2 = GetVar(2000)
XCenter = (XPos1 + XPos2) / 2 'center is midway between XPos1 and XPos2
Code "G0 X" &XCenter 'rapid move to the x center location
Rem Probe up
YNew = YCurrent + 3
Code "G31 Y" &YNew
While IsMoving()
Wend
YPos1 = GetVar(2001)
Code "G0 Y" &YCurrent
Rem Probe down
YNew = YCurrent - 3
Code "G31 Y" &YNew
While IsMoving()
Wend
YPos2 = GetVar(2001)
YCenter = (YPos1 + YPos2) / 2
Rem move To the center
Code "G0 Y" &YCenter
While IsMoving ()
Wend
Code "F" &FeedCurrent 'restore starting feed rate
DoOEMButton ( 1008 )
DoOEMButton ( 1009 )
End If
And this probes the upper left-hand corner of a rectangle.
If GetOemLed (825) <> 0 Then 'Check to see if the probe is already grounded or faulty
Code "(Probe plate is grounded, check connection and try again)"
Else
FeedCurrent = GetOemDRO(818) 'Get the current settings
XCurrent = GetDro(0)
YCurrent = GetDro(1)
ZCurrent = GetDro(2)
probedia = .1875
ProbeOffset = .375
fff = machmsg("Is the probe diameter " &Str(probedia) & "?", "Probe Diameter", 4)
If fff = 7 Then
probedia = question("Enter Current Probe Diameter")
machmsg("Updated probe diameter is: " &Str(probedia), "Probe Diameter", 0)
End If
BackOff = .05
Code "G4 P1" 'Pause 1 second to give time to position probe plate
Code "F4" 'slow feed rate to 4 ipm 100mm
YNew = YCurrent - 2
Code "G31 Y" &YNew
While IsMoving()
Wend
YPos2 = GetVar(2001)
Code "G0 Y" &YPos2 + BackOff
While IsMoving()
Wend
Code "G0 Z" &Zcurrent + ProbeOffset
While IsMoving()
Wend
Code "G0 X" &Xcurrent - .6
While IsMoving()
Wend
Code "G0 Y" &YPos2 - ProbeOffset
While IsMoving()
Wend
Code "G0 Z" &ZCurrent
While IsMoving()
Wend
XNew = XCurrent + 2 'probe 2 inches to right
Code "G31 X" &XNew
While IsMoving()
Wend
XPos2 = GetVar(2000)
Code "G0 Z" &ZCurrent + ProbeOffset
While IsMoving()
Wend
Code "G0 X" &XPos2 - probedia/2
While IsMoving()
Wend
Code "G0 Y" &YPos2 + probedia/2
While IsMoving()
Wend
Code "F" &FeedCurrent 'restore starting feed rate
DoOEMButton ( 1008 )
DoOEMButton ( 1009 )
End If


