Sunday, May 5, 2013

Router lathe -- converted to CNC


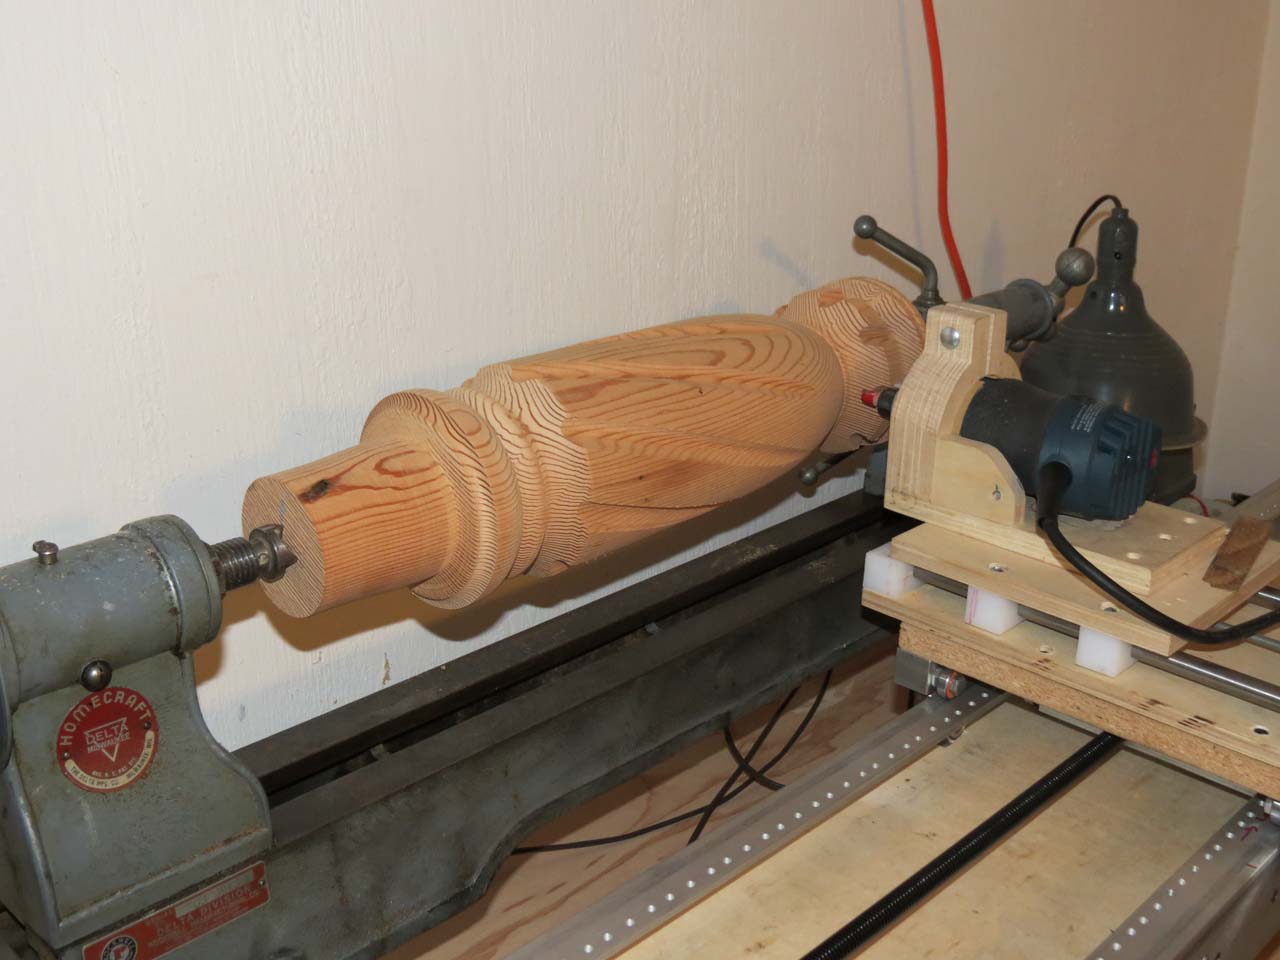
A lot has happened on the router lathe and this posting is way overdue. It's gained a nice new 3rd axis carriage driven by a stepper motor, adding programmable z-axis (depth of cut) control,  and has been converted from arduino control to full CNC, controlled by a PC running Mach3. Here's a video of the first major part cut on the machine since the rebuild.


The conversion to a CNC controller opens up huge potential. The arduino was great for spirals, but it took a lot of code to generate them. I found I could do in 3 0r 4 lines of g code what took 100+ lines of arduino code.  I could have installed Grbl and continued using the arduino as the CNC controller, but I like the feedback graphical programs like Mach3 and EMC2 provide. Although I do have an idea for a little internal thread-cutting machine that Grbl might be perfect for.

Cutting the square profile proved to be a bit of a challenge. Unfortunately, on this machine there's no way to move the cutter relative to the center line of the part (bad planning!), so cutting a flat is a little more complicated. After a calling up some forgotten math and doing some sloppy Excel scripting, I was able to make a spreadsheet to generate code to control depth of cut / rotation ratio that generates a flat surface as the part rotates. Then, rotating the part by increments between each cut to produce the spiral was a matter of learning how to use parameters and subroutines in g code to create loops

Here's the Excel function to make the square:  
=((Offset/COS(angle))+(tool_radius/COS(angle)))-tool_radius
...where offset is the distance from the center of the part to the flat surface you want to generate, angle is the angle relative to the axis of the cutter and tool_radius is... well tool radius. I have a spreadsheet that does all the math and generates g code for different angles and offsets. I'd be happy to share if anyone's interested, but I don't want to post it in its current unfinished state.

Saturday, March 23, 2013

Tripod head adapter


This is an adapter for a ball-head tripod for use with a spotting scope. A ball head works great for a camera, but not so great with a spotting scope -- it's tough to aim a scope when you loosen the ball and everything gets all floppy. This adapter adds a vertical plane tilt mechanism to the top of the ball head. Just lock the ball tight and use the tripod's pan (rotation) and this adapter for the vertical.This setup allows me to have both options -- a pan/tilt for the scope and a ball head for a camera, without carrying a bunch of gear. Plus, the pan mechanism that came with the tripod on the ball head is amazingly smooth, so I get to use that with both heads.

It has an Arca type dovetail quick-release plate on the bottom that attaches to the ball head on the tripod, and a clamp on top to attach to the scope.


The center pivot block is solid acetal plastic, or Delrin and the rest is aluminum. The acetal against aluminum provides a silky smooth motion.

Tilt adapter breakdown


The clamp and plates are compatible with the tripod hardware. The springs fit into holes on either side of the screw and parallel to it to keep the clamp open when not tightened.

Arca type clamp


The plate on the left goes on the bottom and is relieved to fit a locking pin in the tripod head's clamp. The one on the right fits on the scope and attaches to the top.

arca type mounting plates


It works great. Smooth tilt, easy to use. I can pop the whole scope / adapter assembly off and use the ball head with a camera.

Tilt adapter with scope mounted


And here's the tripod with the scope and top assembly removed, and a camera on the ball head. It works very well and only takes a few seconds to switch.

Adapter removed, camera mounted


When I started I figured I could find some standard dimensions for Arca Swiss type dovetail quick-release clamp and plate. I didn't have much luck, so I'll share what I came up with. These are what I used, but I had to tweak the clamp side a bit to make it fit. They should be a good starting point, but use them at your own risk. I have no idea if the Promaster tripod they were based on is a standard size.

Arca type dovetail quick release plate dimensions
I used a couple of 3/32" drills to measure the dovetails (actually .094" dia)


Arca type dovetail quick release clamp dimensions
The clamp side dovetail needed to be cut more than shown here to fit the plate.


Thursday, September 20, 2012

Mobius carvings


I've been salvaging old douglas fir beams from building demolitions for carving. Douglas fir takes on this wonderful texture when it gets old: it becomes more consistent, less difference in hardness between the rings, and it's easier to carve across the grain than new fir. With a sharp chisel, you can make big, bold cuts. Very satisfying. These two mobius carvings were early projects from reclaimed fir.


First attempt -- about 6" 


It was a bit tough to visualize how the surfaces wrapped around the shape, so I started with models. First, I made a donut from modeling clay, drew the corners as they wrapped around the shape, and then scraped a flat plane between the lines. Next, I built a series of models in Sketchup -- a bit laborious, but it helped a lot to see what needed to be done.


To make the small mobius, I started with a donut with a round cross-section, traced the corners as they wrapped around the part and carved a flat surface between the lines, being careful to measure the flats  radially. The larger one was harder: I made it in two halves, doweled together. The majority of the shaping was performed on each half separately, then the finish work was done with the part glued together.

Monday, August 6, 2012

Corner table from reclaimed fir

A friend gave me some old fir boards torn out of her attic. They were getting in the way where I stacked them in the shop, so I decided to mill them down before storing them. But once I started cutting, I got a little carried away and made a table top to go with the spindle I made in the last post.

quarter-round table. front view

The top is a 24" radius quarter round, with the leg centered roughly in the table top.


quarter-round table. top view


The curved front apron was made of several thin pieces of stock laminated around a curved fixture and glued.

table apron


The tripod base with the legs attached by dovetails. The front two legs are at right angles to each other and the rear leg is much shorter. One major mistake was the thin dovetail web between the front legs, that ended up being a weak point I struggled with later.

table legs

It was interesting to build a traditional-looking piece like this. Spindle-turned work always seems to lead in that direction, and in this case, it forced me review some basic skills. It was a good time for that review -- I made a couple of mistakes that could have been avoided if I was a bit more in practice. It was a pretty quick job, and a lot of fun. And it replaces a really ugly folding table in the corner of my living room.

Wednesday, July 4, 2012

Router lathe: making real parts


cutting flutes on a big spindle (5" dia, 22" long)

 First "real" parts -- the big bolt was fun, but just a test, and a bit of a joke. This is the first "real" part -- a base for a round table (I think). I turned the spindle by hand on the manual wood lathe, and modified the thread code to cut a series of flutes. It worked pretty well, in spite of a couple of errors in the code:

1. I intended to climb cut (feed with the cutter so the bit pulls with the direction of travel. Makes a cleaner cut across grain). This code runs the cutter against the direction of travel (conventional cut), which is more prone to splitting when cutting across the grain.

2. I rotate the part by one degree between the forward and reverse cut in order to make a slightly wider cut. But I didn't account for that when spinning between flutes, so each cut advances one degree around the spindle. I actually like the way it looks, so I didn't fix it, but it was a (happy) mistake.


< New lead screw  CNC conversion >

Router lathe: New leadscrew

bottom of x-axis carriage showing new nut and diy tap
Upgraded lead screw. The screw that originally drove the x-axis was a standard hardware store 1/2" x 13 threads per inch rod. It had the advantage of being cheap, easy to work with and with standard threads, easy to connect to. The disadvantage was that it was inaccurate, not straight, and really slow: it took 13 revolutions to travel one inch. I upgraded to an acme lead screw with 5 threads per inch, 2 starts. This gives me faster travel at lower motor RPMs, where they have more torque. It also speeds up the rapid traverse -- it no longer takes a full minute to return the carriage to zero.

The screw was pretty expensive so I just couldn't bring myself to spend another $40 on a nut, and decided to make my own out of UHMW. It only took about 5-6 hours to come up with one that worked... (how cheap do I work? You do the math)

First, I tried to heat form the nut but wasn't happy with the results, so I decided to make a tap and cut the treads instead. I ground a couple of grooves in a length of the acme rod, tapered the ends, made sure that all the thread starts were sharp. Next, a hole was drilled in the UHMW blank a few thou over the thread minor diameter and it was chucked in the metal lathe. With the home brew tap in a chuck in the tail stock, I started the threads by hand. After a few turns, it bound up and started to spin, so I took it out and finished with a vise and a pair of channel lock pliers. That actually worked well because I was able to flex the nut and squeeze the sides in, making the cut deeper. By the time I had gripped the nut by all sides to turn it, it had cut enough clearance to spin fairly freely. Then, I ran the tap back and forth through the nut with  a hand drill a few dozen times until it was running smooth. A little teflon lube and it's running smooth with with very little resistance and almost zero backlash.

A couple of observations:

UHMW has a nasty habit of flexing away from the cutter and springing back, so your cuts and holes tend to be undersize.

This approach worked on UHMW because the stuff is so soft and easy to cut. It might work on acetyl, nylon or acrylic, but I doubt it would work so well. My "tap" was very crude -- I think you'd need to make something much more refined to cut a more rigid material.

I left the burr on the cutting edge, so when I was running it back and forth with the drill, it was shredding off a little bit of material with each cut. It did not leave a clean cut, but it helped to overcome UHMW's tendency to cut undersize -- each time through, it removed a little more material.


Sunday, June 10, 2012

Router lathe: Big bolt

big bolt and nut
The first finished part to come off the router lathe. I figured when building a machine to cut big spirals and threads, what better test than to make a great big bolt and a nut to fit on it.


The entire bolt is about 17" long and 3.5" in diameter. The thread pitch is 2.5 threads per inch. The head and the nut are about 6.5" in diameter and the nut is 2.75" thick. 

The threads work

The original idea that started this project was to adapt a wood lathe to cut great big wood threads, both internal and external. And here they are. In that regard, I guess I'm finished. However, this project has presented a bunch of new exciting possibilities to explore.

With wrench and screwdriver for scale.

(side note: the wood looks like it has been stained, but it's not. This is its color with neutral Watco oil. The wood was some salvaged asian oak of some kind from shipping containers at the port, and came out much darker than I expected.)

Here's the code: Final Arduino Code